
I looooveee science fiction movies and aliens...so this look is something a little futuristic/sci fi looking!
Here is a look I did on myself about a week ago for a photoshoot at the local Flower Festival! It was a fun look to do and I had no idea what I was going to create on my face when I did it! All I knew what that I wanted something bright, futuristic looking, with a bit of silver in it (since my outfit this look had to go with is silver!) SO this look is the outcome of spur of the moment makeup haha! Hope you enjoy!
STEP # 1:

THEN added some Sugarpill Flamepoint pressed eyeshadow (a hot orange) in the creases and a little above the crease (link: http://www.sugarpillshop.com/products/flamepoint-pressed-eyeshadow)
FOUNDATION: I only applied liquid and powder foundation on the top half of my face (none below my eyes because the eyeshadow would mess it up). I even covered my eyebrows a little because I wanted to make them blue/purple.
Be sure to use makeup remover or makeup wipes to get rid of that excess eyeshadow that falls under the eyes.
--------------------------------------------
STEP # 2:

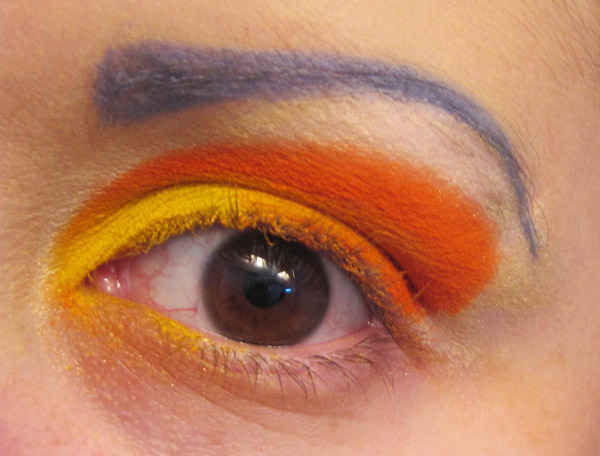
PLUS I used a soft white pressed eyeshadow above the yellow and orange eyeshadows, just to add some highlight.
-----------------------------------------------------------------
STEP # 3:

Time to start with the fun forehead decorations!
First off....start with the first forehead line...
I used a soft white pencil eyeliner to make an outline.

THEN used a liquid purple eyeliner from Hot Topic right above the white pencil. (Link: http://www.hottopic.com/hottopic/Accessories/Cosmetics/Eyes/purple-liquid-eyeliner-892397.jsp)
I didn't extend the purple out to my hairline....stop about an inch or two away.

ALSO used pink liquid eyeliner from Hot Topic (Link: http://www.hottopic.com/hottopic/Accessories/Cosmetics/Eyes/pink-liquid-eyeliner-899905.jsp)
For the pink I started at the hairline and ended about an inch and a half from the point on the purple line (middle of my forehead).
LASTLY used a silver liquid eyeliner over the white line.
-------------------------------------------------------------------
STEP # 4:

Bindi time!!! I used a LARGE bindi right in the middle point of the decorative line!
What is a bindi you ask? Bindis were red dots worn by women in South Asia between their eyebrows as a symbol of marriage....but NOW they are just pretty jewels of all shapes and colors used as decoration by women AND men specifically in India and are no longer a symbol of marriage. I LOVEEE bindis....I wear them all the time....sooo pretty :)
(Link to buy bindis: http://www.amazon.com/Adhesive-Bollywood-Dance-Tattoo-Body-Crystal-Wedding/dp/B004FVVOTQ/ref=pd_sbs_a_9)
ALSO I added some dots for extra decoration with blue liquid eyeliner (also from Hot Topic) and pink liner.

------------------------------------------------------------------
STEP # 5:

I used the same method as Step # 4 to create some more pretty lines and dots.
-----------------------------------------------------------------------
STEP # 6:

Black liquid eyeliner time! I don't usually use any certain brand of black liquid eyeliner....mostly because I go through it like crazzzyyy and I buy whatever I can find that has a SOFT brush....kinda like a paint brush.
I used the black liquid liner to line the top of my lashes and extended it out far enough to reach the end of the orange eyeshadow.
AGAIN make sure to clean up as you go.....cleanup your eyelashes and below your eyes.
----------------------------------------------------------------------
STEP # 7:

I applied white pencil eyeliner on my waterline because it makes eyes look a little bigger....and I wanted kinda freaky lookin eyes for my alien look! Later on I added even more white as you can see in the photos at the end.
I added some blue and green pressed eyeshadow (from Hot Topic: http://www.hottopic.com/hottopic/Accessories/Cosmetics/Eyes/Electric-Green-Baked-Eye-Shadow-569686.jsp)
Green in the corner of the eye and blue extending outward past the black liquid liner. Blend nicely.
------------------------------------------------------------------------------------
STEP # 8:

YESSS I know that lashes are a pain for a lot of you.....you just need the right kind of GLUE!!! I use Ardell.....I WILL NOT use anything else! It is sooo easy to use and dries supperrr fassttt.
(Link: http://www.sallybeauty.com/Eye-Lash-Adhesive/ARDELL34,default,pd.html?cm_vc=SEARCH)
-----------------------------------------------------------------------------------
I hope you guys enjoyed this! I would LOVE to see any photos you take if you try out this makeup look! Send em my way please!
Something else I added later on right before the photoshoot was silver chrome pressed eyeshadow on my lips with some lip gloss over them. In a tutorial later on I will tell you all how I did this! :D
Here are some photos from the shoot I did this look for! All photos by Prelandra (Link: http://www.facebook.com/prelandra) She is an amazing photographer, digital artist AND my best friend!


YAYYYY funn times!
-Kalli/Bumzigana
-----------------------------------------------------------------------------
No comments:
Post a Comment