Femme Alien

Femme Alien
Click to view more makeup designs

Tuesday, July 5, 2011

Red, White, and Blue Crackle Nails Tutorial

This is a tutorial on how my sister did her nail polish yesterday for the 4th of July! You can switch out the colors if you don't want these colors. My sister has done this many times on her nails with all different colors.


Things you will need:

1. Red and blue nail polish
2. Clear coat nail polish
3. Nail File
4. White Crackle nail polish
5. Cotton swabs and/or q-tips
6. Nail polish remover

Here is the nail polish she used:


She got the white Crackle polish at Sally's Beauty Supply

--------------------------------------------------------

STEP # 1:


My sister's nails are perfect! They are 100% real. She files them with a nail filer first...and pushes her cuticles back to expose more of her nail.

Then she painted every other one red....let them dry.

Paint the remaining nails blue. Should alternate from red, blue, red, blue. Let dry. Clean up excess polish that go on your skin with q-tips and nail polish remover.
----------------------------------------------------------------------------------------------


STEP # 2:


After the first coat is completely dry, take the white Crackle nail polish and paint on top of the red and blue polish very fast! It dries suuupppperrrr fast....and you don't have to be as precise with the crackle.

Also, clean up any excess white crackle that got on the skin. 

------------------------------------------------------------------------------------------------


STEP # 3:


After the white crackle is dry, paint over all the nails with a clear protective coat nail polish.
 Looks like my sister still needs to clean up her skin around the nails a bit to get rid of the leftover nail polish on her skin.

You are done!
--------------------------------------------------------------------------------------------

My sister wants to thank you for viewing this tutorial!

Check back weekly for tutorials and more weekly!


-Kalli/Bumzigana

Red, White, and Blue Sequin Makeup Tutorial

Since yesterday was the 4th of July, I decided to do some fun makeup to match my outfit!

Things you will need:
1. Gold, light red, dark red, light blue, dark blue, and white eyeshadow
2. Pencil black eyeliner and black liquid eyeliner
3. Silver glitter liquid eyeliner
4. Black mascara
5. False Eyelashes and eyelash glue (preferably Ardell lash glue, and a cheap lash glue)
6. Red sequins (blue or silver will work too...or all three!)
7. Red and blue pencil (lip liner or eyeliner will do)

---------------------------------------------------------------------

 STEP # 1:

I used a white shimmer pressed shadow under my brow. Plus I used some foundation to cover my eyebrows.

------------------------------------------------------------------------------

STEP # 2:

Take a light shimmer blue pressed shadow....blend it from the corner of your eye, up to the white, and cover most of the eye lid.

Then add some dark blue shadow in the crease and a little above the crease, and on the outer half of my eyelid. I first put it on like this, then blend it in like the photo below. I decided I wanted the light blue I put on first to be a little more vibrant...so I chose a medium color blue/turquoise for that.

---------------------------------------------------------------------------

STEP # 3:

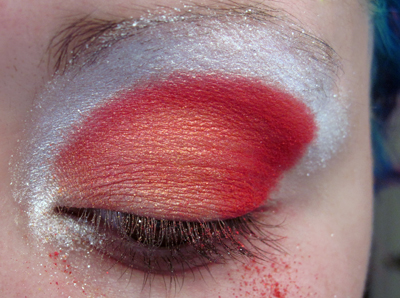
I used a light gold color (like above) then blended it with a light red/orange color like below.


Then used a true red color in the creases and above the creases, and also on the outer half of my eyelid (same method as the blue other eye). Blend, like photo below.


Both eyes will look like this after this step:
Ignore the eyeshadow that fell under my eyes. I cleaned that up with a makeup wipe!
------------------------------------------------------------------------------------

Step # 4:


Time to put eyeshadow below the eyes! Opposites! Red under blue, and blue under red! I used the same reds and blues under my eyes having the line come to a point about half an inch after the outer corner of my eye.

--------------------------------------------------------------------------------

STEP # 5:

Eyebrows!!!


I used a red soft pencil (lip liner actually) for the blue eyeshadow eye. Starting with a line like above to define the bottom of the eyebrow....only extending the line to the arch of the eyebrow.

Then I make a line on the top of the eyebrow and fill in between.

Then I filled in the outer end of the eyebrow and finished if off with defining the inner corner of the eyebrow, like above.


I used the same method with a dark blue eyeliner pencil for the other eyebrow.
--------------------------------------------------------------------------------

STEP # 6:

Then I lined the outline of the red and blue shadow on my eyelids with some silver glitter liquid eyeliner.

--------------------------------------------------------------------------------------------------


STEP # 7:

Take black liquid eyeliner and line your eyelid starting a little from the corner of your eye and extending it outward and up a little further then the blue and red shadow under your eye.


THEN make a second line under that like shown above.
-------------------------------------------------------------------------------------

STEP # 8:

 I took some black false eyelashes and cut them in half. I used the inner half (the right half in the photo above)


...and glued them to the outer half of my eyelids right near my real lashes. (I used Ardell lash glue...it is the only glue that works for me.)


Apply mascara over your real eyelashes....and a little over the false lashes. Apply a bit to bottom lashes too.

-------------------------------------------------------------------------------------------------

STEP # 9:

Fun with sequins!!!!

I had a roll of sequin ribbon that I cut a piece off of, and pulled off the individual sequins to use (15 total sequins).
Use and eyelash glue (probably not Ardell....I used a much cheaper eyelash glue that sucks for eyelashes but works amazing for gluing on gems and sequins! Got my cheap glue at the .99cent store) and make dots in any pattern you like around your eyes. My dots are too big, so make them about half the size. My glue came out too fast.


I started putting sequins on the outer glue dots....it was easier for me that way.

Then added some sequins around the other eye.

The cheap glue takes a bit to dry. This is what is should look like dry...no white glue coming through the centers of the sequins. More sequins around one eye makes the overall design more interesting to me!

Fix up your foundation and you are done!

--------------------------------------------------------------------------------------

Send me photos if you try this!

Here are some photos of the finished results:


Thank you for reading my tutorial!

Sunday, July 3, 2011

Red and Black Stripe Glitter Boots/Shoes Tutorial

I have been asked how I did my purple glitter shoes, and so I decided to take photos along the way while I make some red stripe glitter boots today!

Here are some pics of the purple glitter shoes I made a couple weeks ago:

I used the same process to make these red glitter stripe boots!


----------------------------------------------------------
You will need:

1. A pair of shoes (I got mine at a thrift store....wasn't sure how they would look with glitter, so I only spent $2 on them!!!)
2. Glitter ---- Make sure it is FINE glitter....not large pieces of glitter (fine glitter looks prettier and not clumpy)
3. Mod Podge
4. Two paint brushes ---- One small and one TINY brush
5. A silver sharpie marker (or any metallic marker that shows up on your shoes) AND a black sharpie
6. Patience!!!!

Here are some photos of my black boots before applying the red glitter!


Now its time to glitterfyyy!!!!!


STEP # 1:


Take your silver sharpie marker and make a dotted outline of your design! I chose to do stripes (sort of for the 4th of July!)   ----- there are some photos of the dotted lines in step # 3. Sorry I didn't take a photo at the very beginning!

--------------------------------------------------------------

STEP # 2:


MIX a LOT of glitter into the mod podge (but you don't want it too thick!)
Then take your small sized paint brush and paint inside the dotted lines of the first stripe....and remember to COVER all the dotted lines! You can use tape to keep your lines straight if you'd like (instead of using dots)

Make sure you are using just enough to cover the area you want glittered....don't paint it on too thick.


The photos above show one shoe with wet mod podge glitter mix, and the other shoe is half dry.


 Above is a closeup of the wet mod podge/giltter mix.

Above photo is the first area I painted with the mix already half dry! Oh how the bright sun helps!!!! It dried in about 15 mins outside! You can also see my silver dots through the glitter!!! OH NO.....but that is OK because I will put on a second coat to cover them and any missed spots!


Let your first stripe DRY before starting a new stripe.

-----------------------------------------------------------------------------


STEP # 3:

Continue painting in the lines of the other stripes....one at a time....letting one stripe dry before doing the next.


-------------------------------------------------------------------------


STEP # 4:

After all your stripes are completely dry, you can go back and put a second coat on all the spots where the glitter is too thin. Let dry.

---------------------------------------------------------------------------


STEP # 5:

Take your black sharpie and outline all the red lines (this just makes your lines look more staight)
You don't necessarily have to do this step, I just thought it would make my boots look a bit more finished and nice looking!


Also, I used a red sharpie marker and colored in all the white thread near the bottom of the boots.....this is something that is also unnecessary.
-----------------------------------------------------------------------


YOUR DONE!!! YAYYYY!!!!!

Here are some photos of my finished boots:


I hope you enjoyed this tutorial! I'd love to see photos if you decide to try this :)

-Kalli/Bumzigana